What is Resin Curing?
Resin curing is a critical phase in various manufacturing and crafting industries, including wood working, jewellery making, and composite material production. This process transforms liquid resin into a solid, durable material through chemical reactions. Understanding the resin curing process, its timing, and the challenges involved is essential for achieving optimal results.
Resin curing is a chemical process where liquid resin undergoes polymerization, hardening into a solid state. This process involves two main types of resins: epoxy resin and polyester resin. Both require a curing agent or hardener to initiate the reaction, but they differ in their properties and applications.
- Epoxy Resin: Known for its strong adhesive properties, resistance to chemicals, and durability. It is widely used in coatings, adhesives, and composite materials.
- Polyester Resin: Often used in fiberglass, it is more brittle than epoxy but cheaper and faster to cure.
The Timing of Resin Curing
The curing time of resin depends on various factors, including the type of resin, the amount of hardener used, temperature, humidity, and the thickness of the resin layer.
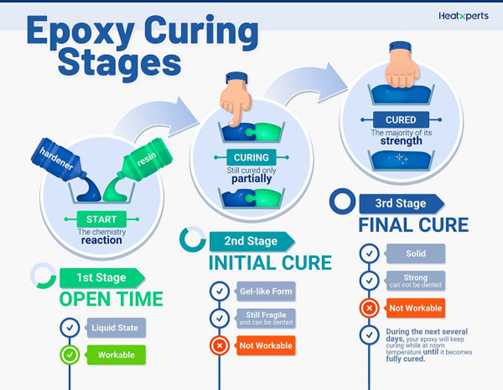
Generally, the curing process can be divided into three stages:
First Stage: Open Time
The first stage of the epoxy curing process is known as the open time, during which the epoxy remains in a liquid state. At this point, the hardener and resin are mixed to initiate the chemical reaction. During this stage, the mixture stays workable, allowing you to perform any necessary clamping and assembly. Ensuring these steps are done during the open time is crucial for achieving a reliable bond.
Second Stage: Initial Phase
The second stage, or the initial phase, marks the transition of the epoxy from a liquid to a gel form, indicating partial curing. At this stage, the epoxy is no longer workable. Its consistency changes quickly from tacky to firm, resembling hard rubber. If you press your thumbnail into the epoxy, it will leave a dent, demonstrating its firm yet pliable state.
Third Stage: Final Curing
The final stage of the curing process is where the epoxy fully solidifies. At this point, the chemical reaction is complete, allowing you to dry sand and shape the epoxy. In this stage, the epoxy should be hard enough that pressing your thumbnail into it won't leave a dent. You can remove any clamps, as the epoxy will have reached most of its strength.
Over the next several days, the epoxy will continue to cure at room temperature until it is fully hardened. If you plan to apply additional epoxy layers, it's essential to sand the surface before applying the new coat to ensure a strong secondary bond.
Here are some approximate curing times for different resins:
- Epoxy Resin: 24-72 hours for initial curing, with full curing in 7 days.
- Polyester Resin: 2-4 hours for initial curing, with full curing in 24-48 hours.
Factors Affecting Curing Time
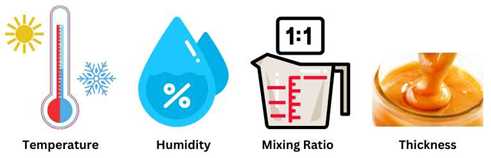
- Temperature: Higher temperatures accelerate the curing process, while lower temperatures slow it down. Most resins cure best at room temperature (70-75°F or 21-24°C).
- Humidity: High humidity can affect the curing process, leading to a tacky surface. It's best to work in a controlled environment with low humidity.
- Mixing Ratio: The proportion of resin to hardener must be precise. Too much hardener can cause the resin to cure too quickly and become brittle, while too little can prevent it from curing properly.
- Thickness: Thicker layers of resin generate more heat during curing, which can accelerate the process. However, too much heat can cause cracks or bubbles.
Challenges in Resin Curing
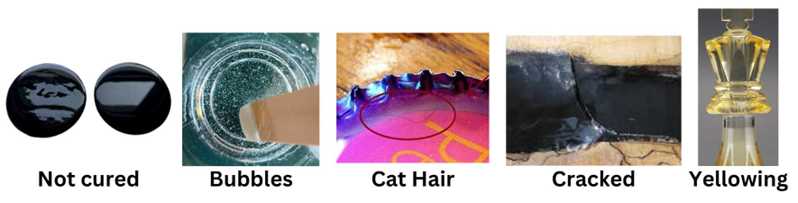
- Incomplete Curing: This can occur if the resin and hardener are not mixed thoroughly or if the mixing ratio is incorrect. The result is a sticky or soft surface.
- Bubbles: Air bubbles can form during mixing or pouring. These can be minimized by mixing slowly, using a vacuum chamber, or applying heat with a torch or heat gun.
- Cracking: Rapid curing or excessive heat can cause the resin to crack. This is common in thicker pours.
- Surface Imperfections: Dust, debris, or an uneven surface can affect the finish of the cured resin. Ensure a clean working environment and use molds or surfaces designed for resin work.
- Yellowing: Exposure to UV light can cause some resins to yellow over time. Using UV-resistant resin or adding UV stabilizers can help mitigate this issue.
Tips for Successful Resin Curing

- Measure Accurately: Use precise measurements for resin and hardener.
- Mix Thoroughly: Ensure the resin and hardener are well mixed to avoid incomplete curing.
- Control Environment: Work in a dust-free, temperature-controlled environment.
- Avoid Thick Pours: For deep pours, consider multiple layers to prevent excessive heat build-up.
- Monitor Temperature: Use a thermometer to ensure optimal curing conditions.
Conclusion
Understanding the resin curing process, including its timing and potential challenges, is essential for anyone working with resin.
By controlling environmental factors, measuring accurately, and following best practices, you can achieve high-quality results in your resin projects.
Whether you're creating art, crafting jewellery, or working on industrial applications, mastering the curing process will enhance the durability and appearance of your creations.