
Transform Your Space: Unleash the Power of Wall-Mounted Monitors with Expert Tips!
In today's fast-paced world, maximizing space and enhancing functionality in our living and working environments has become essential. One of the most effective ways to achieve this is by mounting a monitor on the wall. This trend has surged in popularity, offering numerous benefits such as saving valuable desk space, improving ergonomics, and adding a sleek, modern aesthetic to any room. Wall-mounted monitors create a more organized and visually appealing setup, making them ideal for both home offices and entertainment areas. This article aims to provide you with expert tips on how to successfully mount a monitor on the wall, ensuring a seamless installation that enhances both your productivity and your space.
Understanding Wall-Mounted Monitors
When considering mounting a monitor on the wall, it's essential to understand the different types available and their specific uses. Generally, monitors can be categorized into various types, including standard displays, ultra-wide monitors, and televisions. Each type has its unique advantages depending on your needs—whether for gaming, professional work, or casual viewing. Key factors to consider when selecting a monitor for wall mounting include size, weight, and VESA compatibility, which refers to the standardized mounting interface. For instance, a larger monitor might be perfect for a home theater setup, while a smaller display could be ideal for a workspace. Additionally, assessing the weight of the monitor is crucial; heavier monitors require sturdier mounts and wall support to ensure safety and stability.
Tools and Materials Needed for Installation
To successfully mount a monitor on the wall, you'll need a few essential tools and materials. First, a suitable wall mount bracket is vital; ensure it is compatible with your monitor's size and VESA specifications. You'll also need screws, a drill with appropriate bits, a measuring tape, a level, and a stud finder to locate wall studs for secure mounting. Additionally, safety equipment such as gloves and goggles is recommended to protect yourself during the installation process. It's crucial to invest in high-quality materials to guarantee safety and durability. Poor-quality brackets or screws can lead to accidents, so always opt for trusted options that will hold your monitor securely in place.
Step-by-Step Installation Guide
Installing a wall-mounted monitor might seem daunting, but it can be straightforward with the right approach. Follow these detailed steps to ensure a successful installation:
- Choose the Right Location: Identify where you want to mount your monitor. Consider viewing angles and proximity to power outlets.
- Measure the Wall Space: Use a measuring tape to gauge the height and width of the area where the monitor will be mounted. A good rule of thumb is to position the center of the screen at eye level.
- Mark Drill Points: Use a pencil to mark where the mounting bracket will go. Ensure these points are level and aligned with wall studs for maximum stability.
- Drill Holes: Carefully drill holes at the marked points. If you encounter concrete or brick, use the appropriate drill bits designed for those materials.
- Secure the Mount: Attach the wall mount to the wall using screws, ensuring it is firmly anchored to the studs or appropriate wall supports.
- Attach the Monitor: Once the mount is secure, carefully attach the monitor according to the manufacturer's instructions, ensuring all screws are tightened.
- Check for Level: Use the level to ensure your monitor is perfectly straight. Adjust if necessary before final tightening.
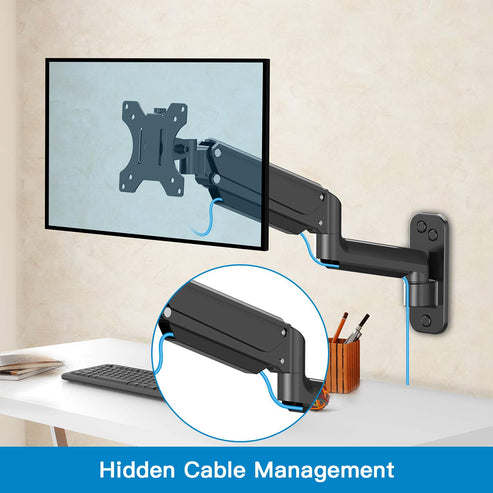
- Connect Cables: Finally, connect the necessary cables and tidy up any loose wires using cable management solutions.
Throughout this process, prioritize safety. If you're unsure at any step, don't hesitate to ask for help or consult a professional.
Best Practices for Wall-Mounted Monitors
Once your monitor is mounted, there are several best practices to follow to optimize its use. Firstly, ensure the monitor is at an optimal viewing angle; the top of the screen should be at or slightly below eye level to reduce neck strain. Additionally, consider cable management solutions to keep cords tidy and out of sight. Use cable clips or covers to maintain a clean look and prevent tangling. Regularly clean the monitor to avoid dust buildup, which can affect performance and visibility. Lastly, take the time to adjust the monitor settings after installation, including brightness and contrast, to enhance your comfort and viewing experience. By implementing these best practices, you'll not only improve your setup's aesthetics but also its functionality.
Enhancing Your Space with Wall-Mounted Monitors
In conclusion, wall-mounted monitors offer an excellent way to enhance the functionality and aesthetics of your space. By understanding the types of monitors available, gathering the right tools, and following a thorough installation guide, you can successfully mount a monitor that meets your needs. Implementing best practices for usage will further ensure that you get the most out of your investment. Whether for work or entertainment, wall mounting is a fantastic option to consider for creating an efficient and stylish environment.